
記住我


We selected five POCUS devices that were commercially available, vary in transducer technology, form factor, and would be suitable for far forward deployment of ultrasound. Additionally, for the clinician preference study, a cart-based Zonare Z.one SmartCart (with an L10-5 probe) from the intensive care unit (ICU) was used. The Zonare Z.one was chosen as an expensive, cart-based device as a contrast to the less expensive portable POCUS devices. The US devices used are listed in Table 1.
Table 1 Characteristics of evaluated US devicesExcept for the Sonivate SonicEye and the Zonare Z.one, the US devices were not sold with a controlling computer or mobile device. Several different controlling devices were used due to different requirements for operating systems and hardware. The Interson SPL01 was operated by a Dell Precision 5540 laptop, the Clarius L7HD and Butterfly iQ were operated by Samsung S7 + tablets, the Sonoque L5C was operated by an 11″ iPad Pro (2020), the Sonivate SonicEye was operated by its proprietary 8″ ruggedized Windows 10 tablet, and the Zonare Z.one was operated by its proprietary cart.
Display characteristics of each probe are described in Table 1. Of the US devices, only the Clarius L7HD, Butterfly iQ, and Zonare Z.one had FDA-approved ophthalmic settings, which were used in the studies. The Interson SPL01 was set to default settings (power 10, “Soft Tissue” enabled, frequency 7.5 MHz). The Sonoque L5C was set to “SmallParts” settings (focus 20 mm, depth 40 mm, dynamic range 50, frequency 10 MHz). The Sonivate SonicEye is unique in that it is a dual probe device, with a linear transducer and a phased array. The SonicEye was set to a proprietary preset (#7) which activated the linear transducer.
Head phantomThe ocular head phantom used in both the physician preference and unskilled operator studies is an in-house design. A detailed protocol for manufacture and bill of materials is available [16]. Briefly, a silicone mannequin head was modified to house a rubber eye socket (molded from an anatomic skeleton). The eye socket contains a gel wax “optic nerve” (ON) suspended in a gelatin mixture. The socket holds a gelatin “ocular orb” and a gelatin mixture eyelid. A picture of the assembled phantom and a representative US is in Fig. 1. The gel wax optic nerve is cast according to different sized, 3D-printed clamshell molds. Due to variability in the final diameter of the optic nerve, the optic nerve width is physically measured along two axes with calipers before final phantom assembly. The hypoechoic “optic nerve” does not contain fine structures such as separate dura mater, subarachnoid space, or a lamina cribrosa. It does provide a circuitous hypoechoic structure with moderately difficult boundaries to measure. We believe that this is an improvement of realism from a previous ONS phantom (housed in a rectangular container) which used a hard plastic disc and its accompanying acoustic shadow to simulate an ONS [14]. We will refer to the gel wax “optic nerve” interchangeably as the optic nerve or the optic nerve sheath for the remainder of the paper.
Fig. 1
Ocular head phantom. A. A picture of the ocular head phantom used in the physician preference and unskilled operator studies. B. An example US of the phantom using a Clarius L7HD
Clinician preference studyClinicians with POCUS experience were recruited from the Surgery Trauma ICU and Neuro ICU to participate in this study. The clinicians were a mixture of advanced practice providers, critical care fellows, and attending physicians. Each participant was given a brief introduction to ocular anatomy and the ONSD measurement procedure by a study coordinator. The coordinator then had the participant evaluate each probe in turn. The order in which participants evaluated the probes followed a Latin Square. For each probe, the coordinator explained to the participant how to use the probe’s software (e.g., zoom, adjust gain, make a ruler measurement). The participant then used the probe to make an ONSD measurement of a head phantom. The study was not designed to evaluate the accuracy of ONSD measurement and therefore the clinician measurements were not analyzed. Note, the Sonivate SonicEye software did not have ruler functionality so participants could only save a still image. After evaluating all six ultrasound probes, each participant then filled out a preference survey [16]. The survey asked the participant to rank the probes (1 being best, 6 being worst) for the following categories: Image Quality, Ease of Acquisition, Software, Tactile Feel, Overall for ONSD.
Analysis-of-variance (ANOVA) was performed individually on each category to determine whether there was a statistically significant difference in rank across probes. We limited post hoc testing to the Butterfly iQ and Clarius L7HD probes due to the relatively small sample size (15) compared to the number of probes (6) evaluated. These two probes were selected as they were the only two POCUS probes with ophthalmic settings and also were evaluated on the same hardware (Samsung S7 + tablet). Wilcoxon signed-rank was used for each category to test the null hypothesis that each probe’s paired ranking came from the same distribution.
Unskilled operator studyEach participant attended an initial training session followed a week later by the evaluation session. During the training session, participants were described the general anatomy of the ocular orb, the ONS, and the basic principles of ONSD measurement. They were given written instructions for the blind ONSD procedure:
1.Apply ultrasound gel to the eyelid.
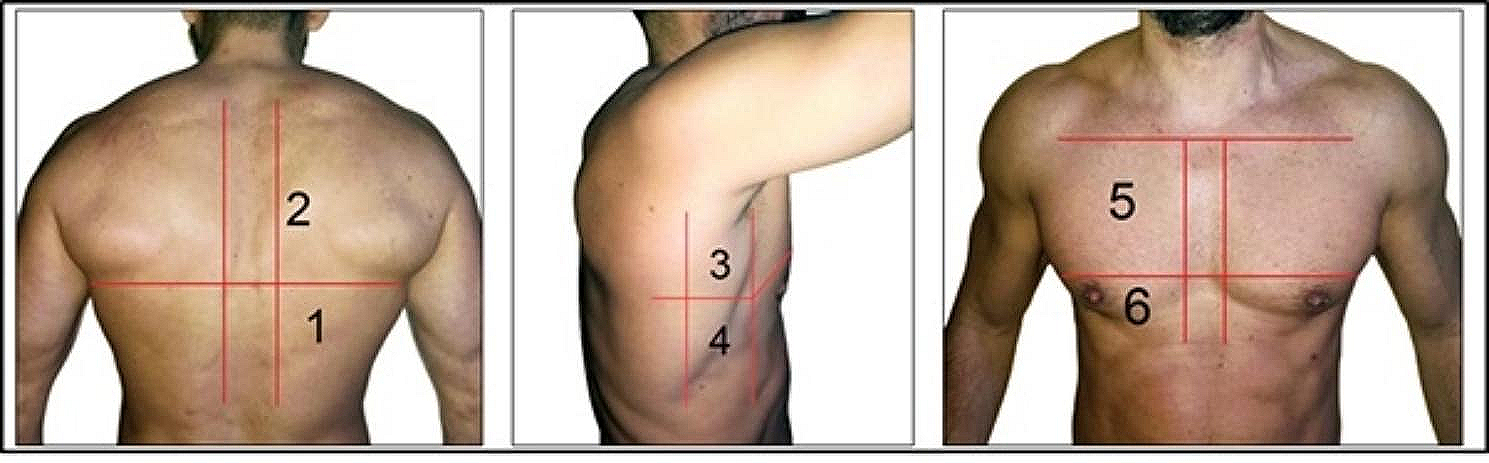
2.Place the probe on the center of the eyelid in a horizontal (transverse) orientation
3.Rock the probe to a 30 degree angle upwards
4.Count to eight while slowly moving the probe downwards to an opposing 30 degree angle
After the brief training, each participant evaluated each of the five POCUS probes in turn (the Zonare Z.one was not included in this study due to lack of availability). During the training session only, participants were able to view the B-mode video from each probe’s software (setup by the coordinator) as they performed the blind ONSD procedure on a head phantom. The study coordinator assigned the order each participant evaluated the probes using a Latin Square.
Participants returned a week later for an evaluation session. The participants were given the same written instructions for the blind ONSD procedure. Each participant performed the procedure on three different head phantoms for each probe; each head had a different ONSD (verified by physical caliper measurement on the gel wax ON). The coordinator visually confirmed an appropriate amount of US gel was applied to each phantom. The participant communicated when they were ready to start (i.e., the probe was center on the eyelid at an upward 30 degree angle). The participant would then rock the probe downward and upward until the coordinator recorded approximately 30 s of video using the probe’s system. Unlike the training session, participants could not view the B-mode video during the procedure. The coordinator provided no feedback regarding the quality of the probe position on the phantom. The order in which each participant evaluated the probes followed a Latin Square.
These videos were preprocessed by cropping (removing identifying overlays) and converted to a uniform file format using the open source ITKPOCUS Python package [17]. A single annotator used the ImageViewer application to score each video [18]. The annotator was blind to the probe, participant, or phantom corresponding to the video, and videos were served in random order. The annotator counted the number of passes (upward–downward and downward–upward) over the ONS in the video and whether each pass was successful (i.e., whether the entire horizontal span of the ONS was visible in at least one frame during the pass). Passes that failed were due to either the ONS being off-center or occluded by poor transducer contact artifacts. The annotator then picked the clearest frame of the ONS in the video and manually measured the ONSD (3 mm away from the ocular orb and perpendicular to the ONS).
Ordinary Least Squares (OLS) regression was used to estimate the expected difference between the annotator’s manual ONSD measurement and the average caliper measurement of each phantom by device. The Python package, statsmodels, was used to calculate the regression model and tests [19].
Lab analysisWe conducted the lab analyses of the POCUS probes using the CIRS 040GSE calibration phantom [20]. This phantom is different from the head phantoms used in the clinician and unskilled operator studies; it is a commercially available phantom typically used to assess the image quality of US probes. The 040GSE phantom has a combination of precisely located 100 micron diameter wire targets, and 8 mm diameter varying-contrast targets (− 9 db, − 6 db, − 3 db, 3 db, 6 db, and hyperechoic). For each probe and phantom region, triplicate B-mode images were acquired (the probe was removed, repositioned, and the image saved). These images were then manually labeled for each structure in the phantom (e.g., wire, contrast target). The B-mode images and their corresponding label images were then input into our analysis software.
The generalized contrast-to-noise ratio (GCNR) is a measure of overlap between foreground and background pixel intensity probability density functions (PDFs) [21]. Formally, let \(_\) and \(_\) be the foreground and background PDFs, respectively. The GCNR is defined as\(gCNR= 1-\frac_^min\_(x), _(x)\}dx\). A GCNR of 1, therefore, signifies that an ideal classifier can completely separate the foreground and background pixel intensities (i.e., there is no overlap between PDFs), while a GCNR of 0 means the intensity distributions are identical between foreground and background. A 1.7 mm padded bounding box was computed for each contrast target. The labeled contrast target was the foreground in the GCNR computation and the background was the remaining pixels in the bounding box. The default gain of each device was used for the standard GCNR calculations. For the gain GCNR experiments, the gain settings were adjusted using each device’s software at 0, 20, 40, 60, 80, and 100%.
Signal-to-noise ratio (SNR) was calculated as the mean row-wise intensity divided by the row-wise standard deviation of a 3 mm wide user-specified bounding box right of the vertical wire group. The bounding box contained no structures except for the background gelatin of the phantom.
Point-spread functions (PSF) were estimated from the 100 micron diameter 1, 2, and 3 cm vertical wire targets. A 3 mm line (centered at the centroid of the labeled wire target) was sampled vertically and horizontally. For elevational PSF, the probe was oriented at a 45 degree angle to the wires and the horizontal PSF from the image was recorded. Peaks were identified in each curve using the find_peaks method in the scipy python package [22]. To average the PSFs from the triplicate images, each image’s PSF was centered at its peak. The resulting centered curves were then resampled and averaged to compute the mean PSF.
The source code and software for the lab analysis is publicly available along with the image dataset [16].
留言 (0)