
Remember me


Cardiac arrest is a state of abrupt onset of absent or inadequate contraction of the heart that immediately leads to absent perfusion to the brain and vital organs. If not restored promptly, this will lead to certain death within minutes. Cardiac arrest can be caused by several pathologies the most common being hypoxia, hypovolaemia, myocardial infarction, hyperkalaemia, trauma and drug overdose. These conditions lead to pathological cardiac rhythms such as ventricular fibrillation, pulseless ventricular tachycardia, asystole and pulseless electrical activity. Basic life support (BLS) includes a series of resuscitative efforts, which when done correctly and sequentially can save the lives of patients in cardiac arrest, respiratory arrest, obstructed airway and drowning. The term ‘basic’ means that this effort can be started immediately by an empty-handed bystander at the arrest site (even in an out-of-hospital scenario) whether she or he is a medical or non-medical person. Bystander cardiopulmonary resuscitation (CPR) effort increases the chances of survival by 2–3 folds abetting return of spontaneous circulation.1
An International Liaison Committee on Resuscitation (ILCOR) was formed in 1992 to synchronize the efforts of resuscitation worldwide. Since 2015, the ILCOR works in coordination with other organizations such as the European Resuscitation Council and the American Heart Association to assist yearly review of published evidence in resuscitation. Bystander CPR induction has been poor across the world, and hence, these organizations made a concerted effort to simplify resuscitation guidelines, particularly for the non-medical bystander. These adaptations included emphasizing immediate chest compression by assessing unresponsiveness and breathing, without having to check for pulse (this can be difficult to feel even for trained professionals) and promoting ‘hands-only CPR’, without the need for delivering breaths.2 Crucial life-saving steps in BLS include the early identification of cardiac arrest, activation of the emergency response system, high-quality chest compressions and early defibrillation.3
Several but fragmented efforts have been made to train and empower medical, paramedical and civilians in BLS at the Central Government, state, medical college and department levels across India. These efforts have mainly been led by anaesthesiologists, emergency physicians, internists and nurses. It is important to understand that BLS is a team effort and saving a life will require multiple processes in series, the ‘chain of survival’ emphasized in the latest guidelines.4 ‘Chain of survival’ refers to the integrated care of an arrest victim from the onset of CPR to transfer to the intensive care unit and recovery.5,6
All doctors, nurses and paramedical staff working in clinical areas must be regularly trained in providing BLS and all healthcare personnel should go through compulsory training at the time of starting their clinical role. BLS training has been mandated for undergraduates in the updated Indian medical curriculum 2019.7
Although BLS can be done by laypersons, this article is intended only for healthcare professionals. The article highlights the vital steps and the proper technique for an effective quality CPR effort. This article is complementary to practising the steps and the technique on a mannequin. Learners should practise the technique through simulated scenarios in their own hospital or in out-of-hospital settings. The BLS algorithm/technique is slightly different for different age groups and is best divided into adults (puberty to adults), children (1 year until puberty), infant (younger than 1 year) and neonates (neonates first hospitalized following birth). Neonatal resuscitation is not discussed in this article.
BASIC LIFE SUPPORT FOR ADULTS (APPLIES TO ANYONE ABOVE PUBERTAL AGE) Ensuring scene safety, identifying cardiac arrest and activation of emergency responseThe first step when you approach a collapsed or potential cardiac arrest victim is to confirm that the patient is really in arrest. This time-bound step needs to be done as soon as possible, usually within 10 seconds of the first interaction with the patient. An important consideration here is to ensure that it is safe to approach the patient. The victim who is collapsed and in arrest may be in the middle of a busy road, crowded railway platform or in the outpatient department. In such cases, the patient should be first brought to the side to avoid any mishap. After ensuring scene safety, the rescuer should assess the responsiveness of the patient; this is done by tapping on the shoulders and calling out to open the eyes or asking the name.
Once the patient is confirmed unresponsive, a call to activate the emergency response should be made. It is essential for all healthcare professionals to know the telephone number of the ambulance service. Activation of the emergency services is best done by another bystander, unless the rescuer is alone on site in which case, he or she will make the call using his or her mobile or whatever is appropriate. When calling, it is important to share the location of the patient concerned and brief information about the situation, scenario and how many victims, etc. Importantly, the rescuer needs to specifically ask for a defibrillator, ideally an automated external defibrillator (AED) in an out-of-hospital setting, to be brought to the site as all ambulances may not be equipped with it.
Early chest compressions and assisted breathingHaving activated the emergency response, the rescuer should assess the breathing pattern (no breathing or gasping suggests a state of cardiac arrest) and simultaneously assess circulation by feeling for the carotid artery on the same side as the rescuer. This is done by placing the first three fingers in the groove between the sternocleidomastoid muscle and the larynx usually at the level of the thyroid cartilage and on the same side as the rescuer (Fig. 1). This is done for at least 5 seconds but not more than 10 seconds. To ensure that one has not waited for more than 10 seconds the rescuer may mentally count as one thousand and one, one thousand and two, etc. If no pulsations are felt or there is a doubt, the rescuer must immediately initiate chest compressions. Early and high-quality chest compressions make all the difference when saving lives. Before starting chest compressions, one must ensure that the position of the rescuer and the patient is such that quality compressions can be delivered. Ideally, the rescuer should be kneeling on one side of the patient such that the hip of the rescuer is above the chest of the patient. The patient should be on a hard surface to allow proper compression of chest (Fig. 2). Thirty chest compressions should be followed by delivery of two mouth-to-mouth breaths, each delivered over 1 second.
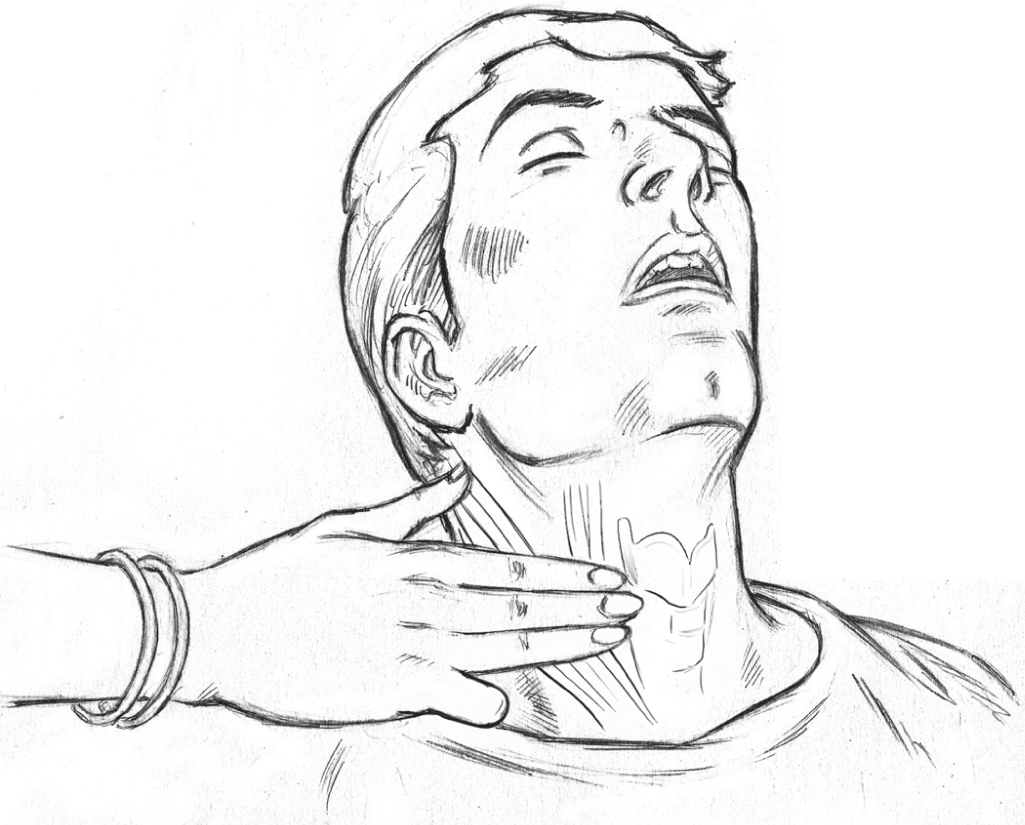
FIG 1.: Check for carotid pulse by placing three fingers in the groove between the sternocleidomastoid muscle and the larynx at the level of thyroid cartilage
Export to PPT

FIG 2.: Correct technique of chest compression in an adult victim. Notice the shoulder of the rescuer is directly above the chest of the victim. The wrist, elbows and shoulders are locked. The chest compression movement is from the hip joint. Quality chest compressions can only be provided on a hard surface
Export to PPT
Technique of chest compressionsThe dominant hand is placed over the lower third of the sternum avoiding the xiphoid process. A firm contact is made with the chest surface. The palm of the hand is in contact but the fingers are kept away without touching the chest wall. The second hand is placed over the first and clenched together (Fig. 2). The compressions are then started at the rate of 100–120 compressions per minute. The depth should be maintained between 5 and 6 cm. The rescuer must allow adequate recoil of the chest wall. This will allow the heart to refill with blood after compression. After 30 chest compressions, the rescuer takes to breathing and has to provide two breaths in the mouth of the patient over 3 seconds (technique discussed below). This cycle is repeated five times (five cycles of CPR) before the pulse is rechecked. This is best done by the second rescuer if available on site. After five sets of 30 chest compressions and two breaths, one should check the pulse and decide the next interventions. Providing 10 or more minutes of high-quality CPR can be exhausting particularly if there is a single rescuer. If two or more rescuers are present, it is recommended that chest compressors should rotate after every five cycles of CPR. Every attempt should be made to minimize interruptions to the chest compressions, which are the single most important step.
Quality of CPR should be maintained throughout the CPR effort. This includes a rate of 100–120 per minute, compression depth of 5–6 cm (about one-third of the antero-posterior diameter of the rib cage), allowing adequate recoil of the chest wall, rotation of compressors to prevent rescuer fatigue, minimize interruptions in chest compression and avoiding excessive ventilation. Quality of CPR can be objectively assessed by measuring some of these parameters using a novel real-time feedback device. The device is placed on the lower sternum of the patient between the hands of the rescuer and the chest of the victim while CPR is being provided.
Assisted breathingMaintaining a patent airway during CPR is an important step. In a patient where injury is not suspected, the rescuer must place a hand on the forehead and the other on the chin and simultaneously tilt the head and lift the chin (Fig. 3). In trauma victims, this can be done by the jaw thrust technique to avoid movement of the cervical spine. These simple manoeuvres will allow the tongue to move away and improve air flow through the airway. Having performed this technique, the rescuer should place his or her mouth over the mouth of the patient, pinching the nose and blow air keeping an eye over the chest. A visible chest rise suggests adequate air is provided. This is done over 1 second, and after waiting for another second, another breath is provided by the rescuer again over 1 second. Right after two breaths have been provided, the rescuer must get back to providing effective chest compressions. An important step here is to peep inside the mouth just before one starts to provide ventilation as removing a foreign body, broken teeth or blood clot will prevent obstructing the airway. If a pocket mask is available, it can be fixed on to the face of the patient firmly to prevent any air leak and the rescuer should blow air through the port provided.
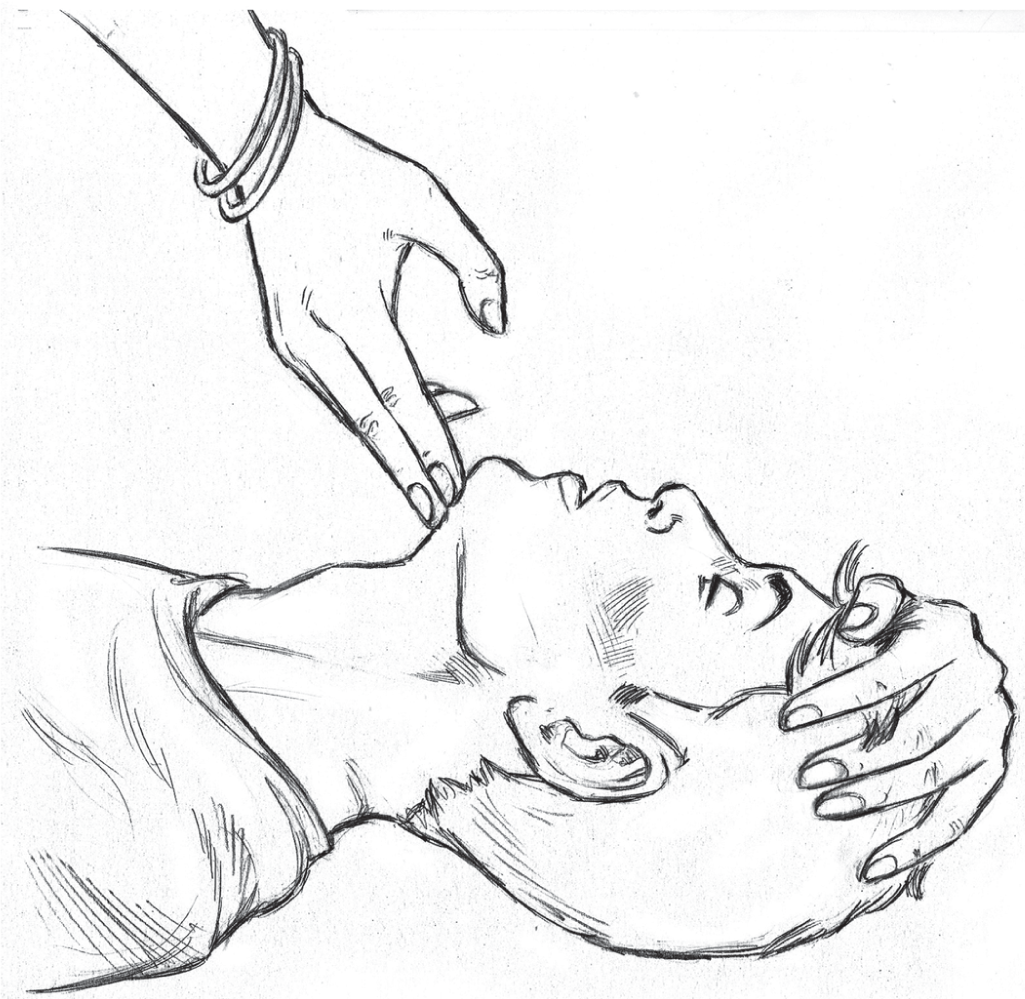
FIG 3.: Head tilt and chin lift technique to open the airway
Export to PPT
Running the cycles of chest compressions and breathingAfter every 30 chest compressions, the rescuer must provide two rescue breaths as detailed above. This is one cycle of CPR, and after five cycles of CPR, the rescuer compressing the chest should ideally rotate to manage the airway and vice versa. This is not possible when there is a single rescuer. The effort continues until the AED arrives or the patient is revived or the rescuer is totally exhausted. The sequence of BLS is shown in Figs. 4a and 4b.

FIG 4a.: Algorithm for basic life support (BLS) when an automated external defibrillator or AED is not available. If no responsiveness, then activate emergency response
Export to PPT
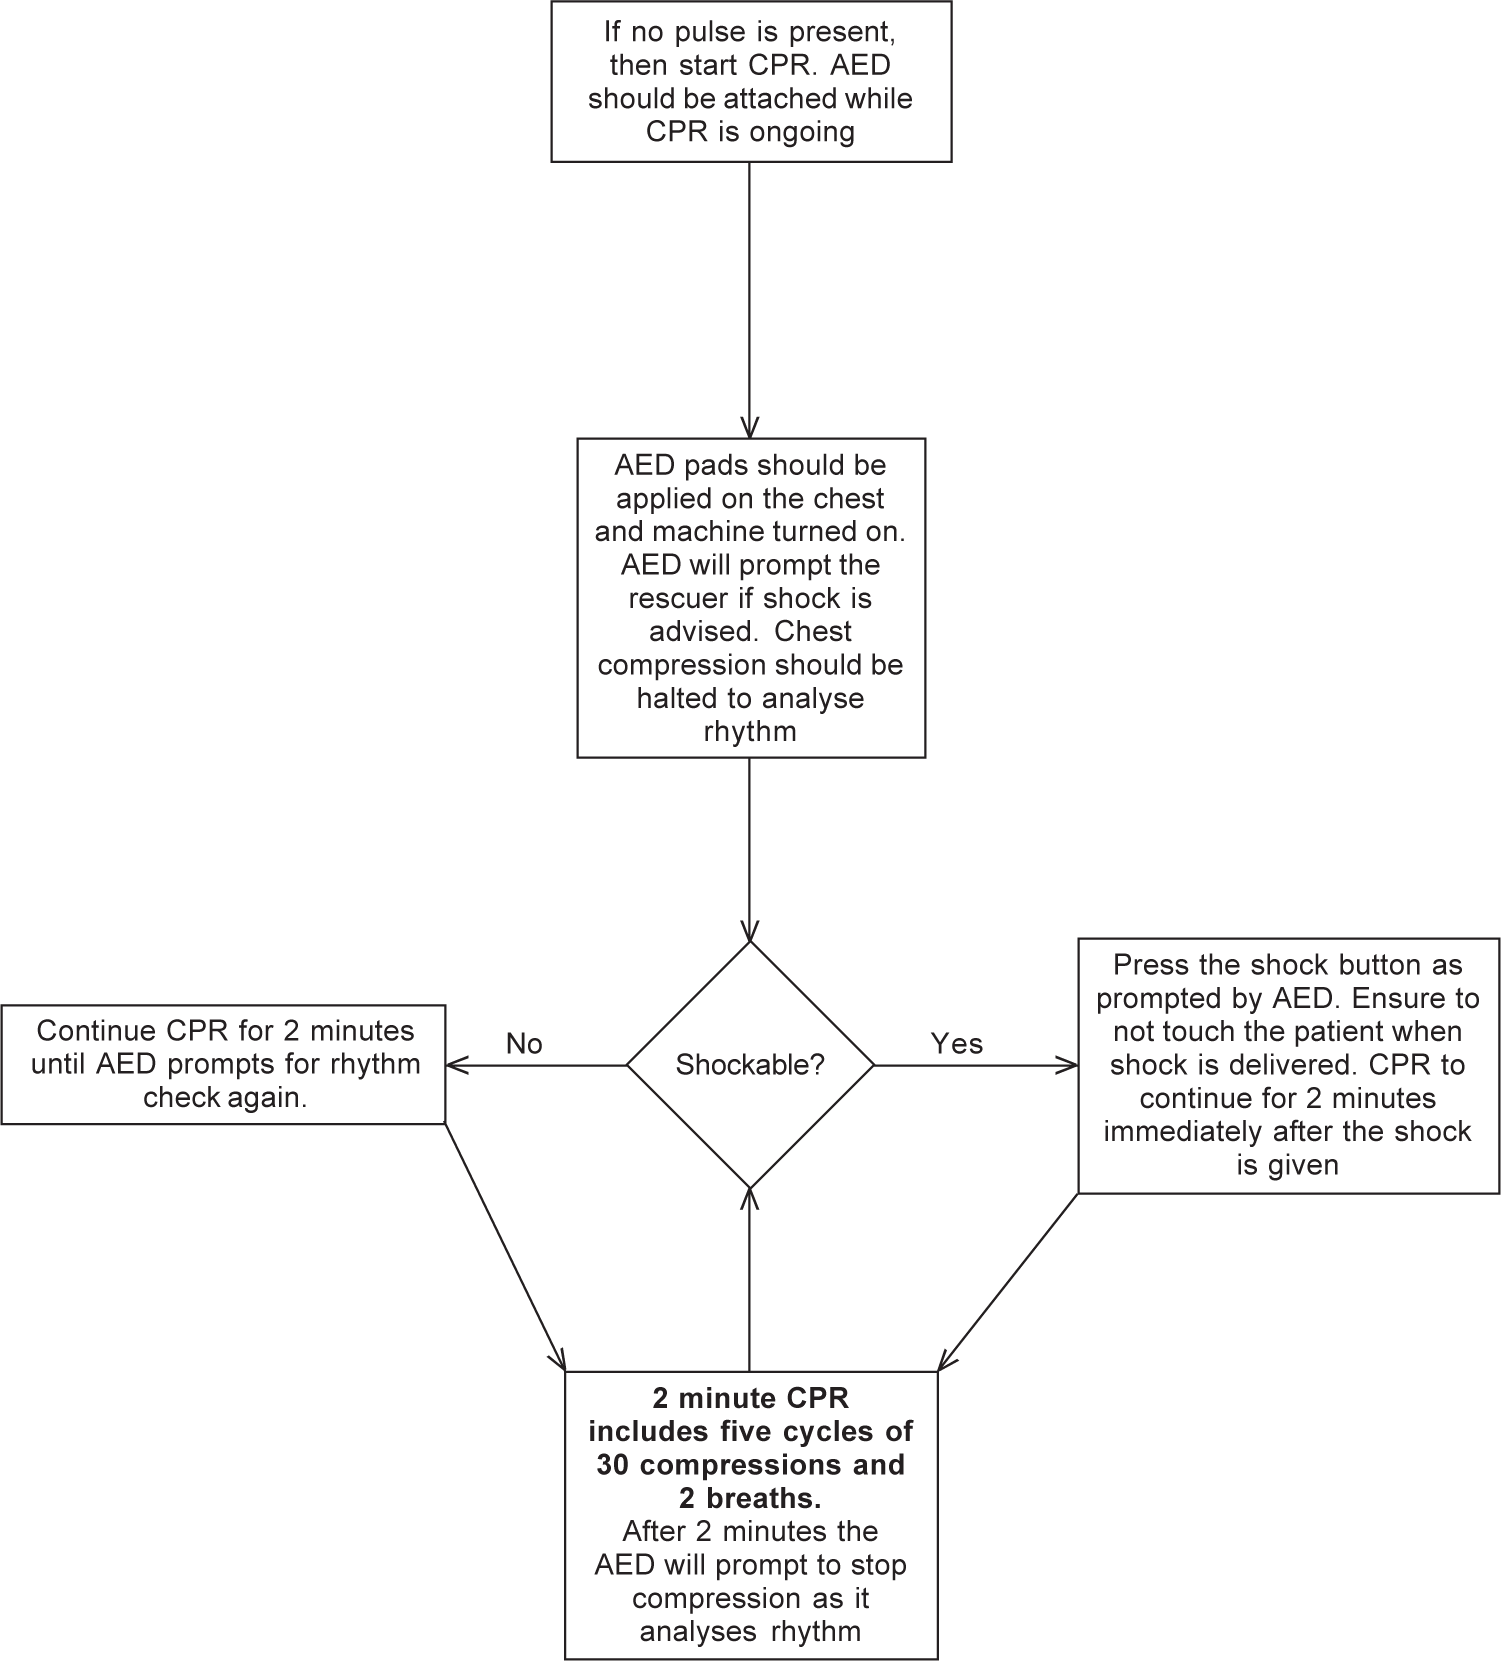
FIG 4b.: Algorithm for basic life support (BLS) if an automated external defibrillator (AED) is available. Note if a manual defibrillator is available in BLS ambulance then rhythm will need to be assessed every 2 minutes and time keeping will be required. Shock will have to delivered manually. The manual defibrillator should be used by a trained personnel
Export to PPT
Early defibrillationDefibrillation refers to an electrical shock provided to the heart by a defibrillator machine attached to the chest wall using pads or paddles. There are two types of defibrillators: One is a manual defibrillator which is an advanced machine available in inhospital settings and requires training. These are usually not available for peripheral or out of hospital use. The other AEDs are easy-to-use defibrillators and can be used effectively by non-medical people as well.
Steps in defibrillation using AEDsExpose and clean the chest wall of any water, apply pads on the surface of the chest and connect the pad leads to the machine. Once the pads are applied and the leads connected to the machine, switch on the AED. The AED will automatically analyse the underlying rhythm; at this point one must abort the chest compressions. Having analysed the rhythm, the machine will give a voice prompt whether the patient must be shocked or the CPR must continue without shock (Fig. 5). In the former situation, a shock button on the machine will start to light up and prompt the rescuer to shock the patient. The rescuer having made sure that no one is touching the patient, should press the button to provide shock and instantly start chest compressions thereafter. After five cycles of CPR, the AED is used again to analyse rhythm and deliver the shock, if advised.
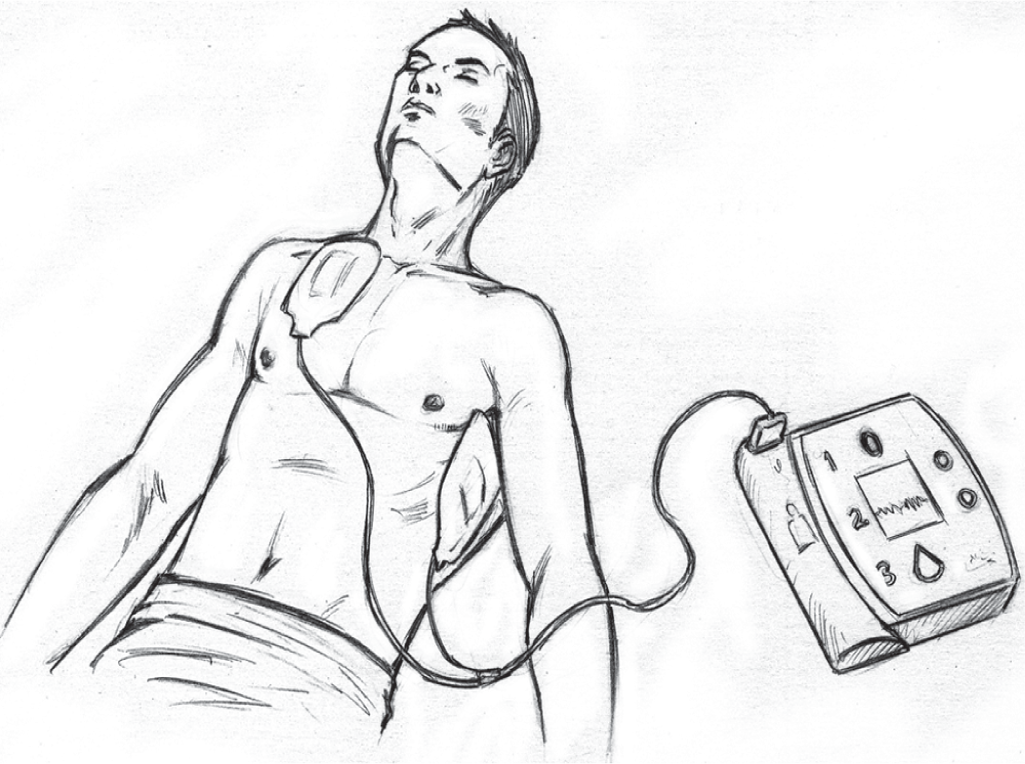
FIG 5.: Placement of automated external defibrillator (AED) pads on the victim
Export to PPT
BASIC LIFE SUPPORT IN CHILDREN (APPLIES TO A CHILD >1 YEAR UNTIL PUBERTY)Just as in adults, one must approach after ensuring that the scene is safe. The rescuer must check for unresponsiveness by tapping on the shoulder. If the young patient shows no response, shout for help and activate emergency response. Assess breathing pattern (gasping or no breathing effort would suggest cardiac arrest) and check carotid artery for not more than 10 seconds. CPR should be started if there is no pulse or the pulse rate is <60 per minute with signs of poor perfusion (pallor, mottling and cyanosis). The chest compressions are given in the same location as in adults and the two-hand technique as in adults; the one-hand technique may be applied if the chest wall is small. The depth of the compression is the same as in adults.
Compression to ventilation ratio is 30:2 if there is a single rescuer or 15:2 if there are two rescuers. If the patient is in respiratory arrest only and requires delivery of breaths without chest compressions, 20–30 breaths/minute should be provided unlike adults who require 10–12 breaths/minute in the same situation. For children up to 8 years old, the child pad system with dose attenuator for defibrillation must be applied. Adult AED and pads can be used if paediatric pads are not available.
In summary, the flow of arrest algorithm is exactly the same, the key differences are in the technique of chest compression, which may require one hand only if the chest wall is small and the compression to ventilation ratio in case there are two or more rescuers on site. In patients with respiratory arrest with a pulse, 20–30 breaths/minute should be provided as per the 2020 guidelines. Ideally, child pads with attenuator should be used for defibrillation.
BASIC LIFE SUPPORT IN INFANTS (APPLIES TO A CHILD <1 YEAR)A few differences in the BLS approach in infants are highlighted here. After ensuring scene safety, the rescuer should tap on the infant’s sole and call out to check the response. If the child is unresponsive, the rescuer must shout for help and activate emergency response. The next step is to assess for breathing and feel for pulsations on the brachial artery midway on the medial side of the upper arm. If the pulse is not felt for a maximum of 10 seconds or the pulse rate is lower than 60 per minute with signs of poor perfusion, immediate chest compressions should be initiated. After the first 2 minutes of CPR, the rescuer should again check for pulse. If no pulse is present or rate is below 60 per minute and signs of poor perfusion, CPR should be continued for another five cycles just like in the adult algorithm. Rescuer if alone must provide a two-finger chest compression. The fingers are placed just below the intermammary line on the sternum (Fig. 6). If two or more rescuers are present, two thumbs are used to compress the chest with the fingers encircling the chest (Fig. 7). The rate of chest compression is the same as in adults and the depth of compression is one-third of the antero-posterior diameter of the chest. The compression to ventilation ratio is 30:2 in case of a single rescuer and 15:2 in case of two rescuers. The infant AED pads with dose attenuator should ideally be used for defibrillation; however, if not available, adult AED pads may be used with one pad over the left side of the chest and the other on the back (Fig. 8). In summary, key differences from adult BLS are the site for pulse check, technique of chest compression (two-finger and two-thumb technique), the compression to ventilation ratio of 15:2 (in two-rescuer effort) and the use of infant AED pads with dose attenuator.
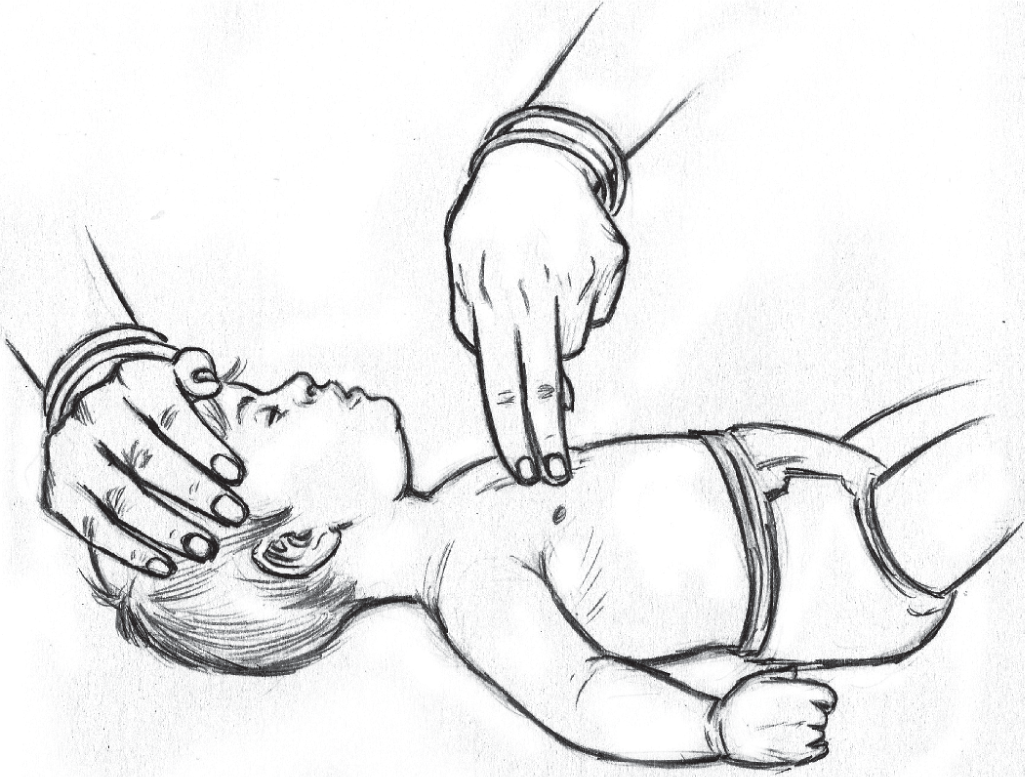
FIG 6.: Two-finger chest compression technique for children less than 1 year
Export to PPT
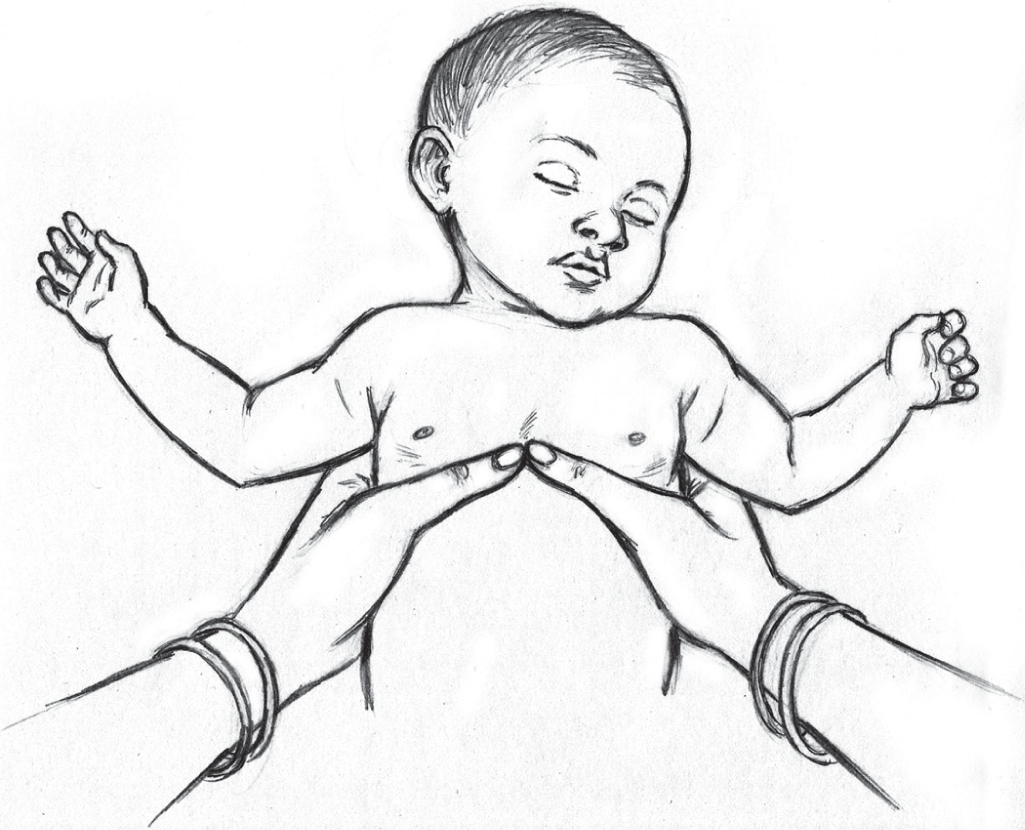
FIG 7.: Two-thumb technique for children less than 1 year
Export to PPT
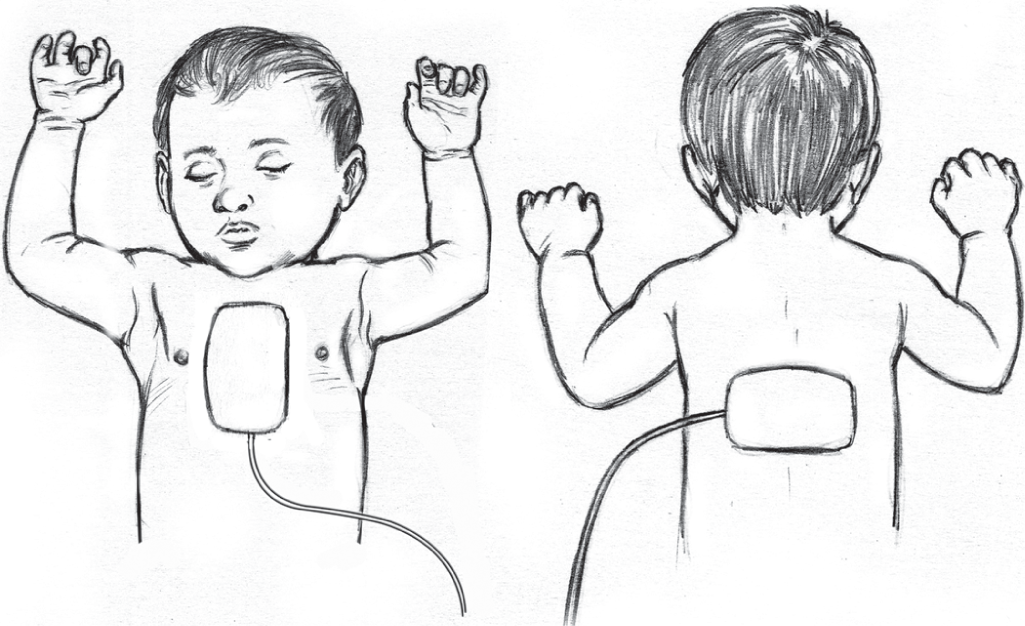
FIG 8.: Placement of AED pads on an infant
Export to PPT
FOREIGN BODY AIRWAY OBSTRUCTION OR CHOKING IN ADULTS AND INFANTSA patient who has a foreign body in his or her airway can have hypoxic arrest and die within minutes. On choking, the patient usually places both hands on the neck, also known as the universal choking sign (Fig. 9). In this situation, he or she will not be able to breathe, talk, cry or even cough. Sometimes, patients may have stridor or high-pitched noisy breathing. The rescuer must be quick to identify these patients, which often happens on the dining table after food is stuck in the airway. Having confirmed that the patient is choking, the rescuer should stand behind and encircle the patient using his arms, keeping his fists on the abdomen between umbilicus and the xiphoid process of the sternum. Having set his position, the rescuer must give upward and backward thrust in the abdomen (Fig. 9). The abdominal thrusts must continue until the object is expelled and the patient can breathe, cough or talk. This technique is popularly known as the Heimlich manoeuvre. If the patient becomes unresponsive, the patient has to be laid on the floor and assessed as in cardiac arrest. In unresponsive state, the airway must be opened using the head-tilt chin-lift technique and the rescuer must look inside the mouth and remove any food or foreign body from the mouth if present. Blind sweep using a finger should be avoided.

FIG 9.: Universal choking sign as demonstrated by victim and the correct position of the rescuer behind the patient demonstrating the Heimlich manoeuvre
Export to PPT
In a clinical scenario when an infant has an obstructed airway, the rescuer should support the head of the infant with fingers on his face on the malar prominences. The infant should then be positioned in prone with rescuer’s thigh and arm supporting the body of the infant and keeping the head low. Once positioned, five back slaps using the heel of the hand should be applied between the scapulae (Fig. 10). The rescuer then uses his fingers to support the occiput and the infant is positioned supine over the rescuer’s thigh and arm, keeping the head low again and five chest compressions are provided with two fingers just below the nipple line (Fig. 11). Repeated cycles of back slaps and chest compressions should be provided until the foreign body is expelled or the infant is responsive.
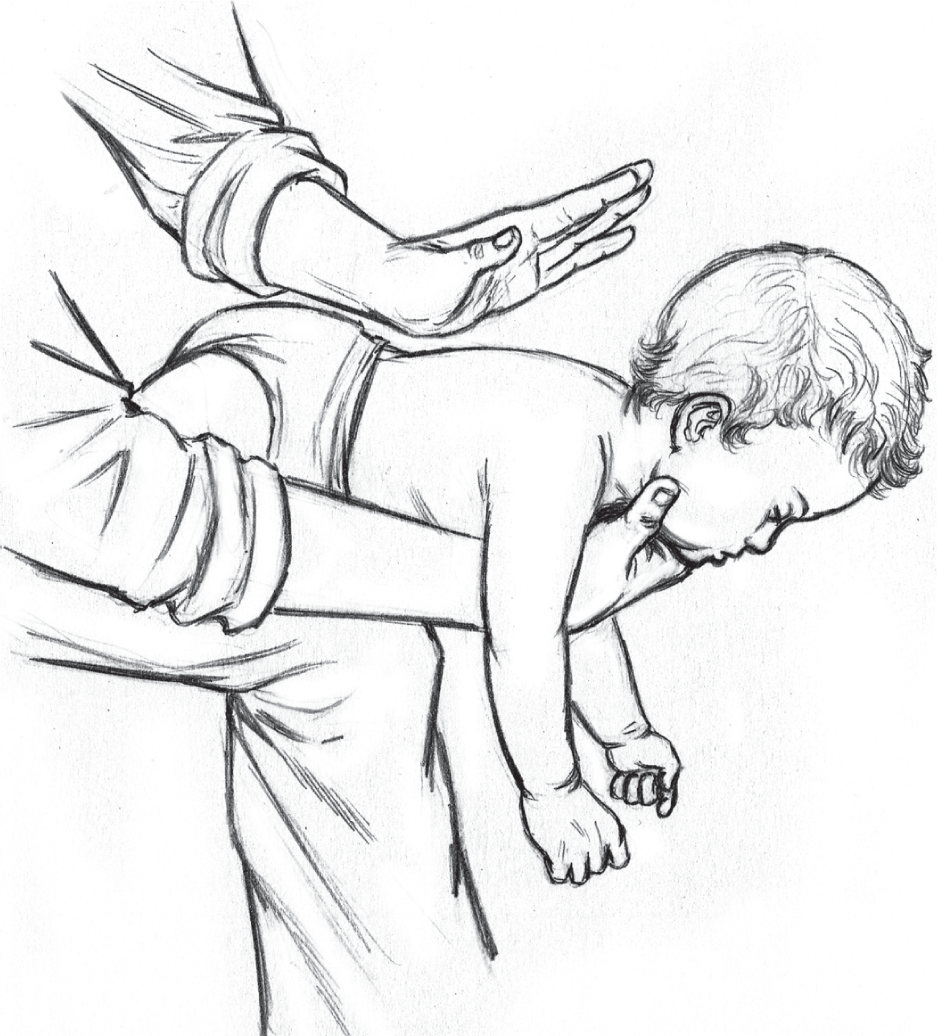
FIG 10.: Correct position and technique for providing back slaps using the heel of the hand between the scapulae in infants with foreign body airway obstruction
Export to PPT

FIG 11.: Correct technique for providing chest compressions with two fingers just below the nipple line. Note repeated cycles of back slaps (Fig. 10) and chest compressions should be provided until the foreign body is expelled
Export to PPT
CONCLUSIONGovernment-supported community preparedness through regular training programmes in schools and colleges, investing in pre-hospital infrastructure and appropriate training courses for healthcare professionals including paramedics, ambulance crew and policemen will go a long way in improving survival rates among patients with cardiac arrest. Training of trainers’ programmes are needed for capacity building and developing a high calibre trainer of CPR.
Comments (0)